When tackling a DIY roofing project, remember safety is of utmost importance. Select durable and stylish materials like metal or clay tiles. Prep the roof surface meticulously, clear away any debris, and confirm it can support new materials. Install underlayment correctly with weather conditions in mind for optimal performance. Manage roof slope with safety measures like using roof jacks. Adhere to proper sealing techniques to avoid water damage. Establish proper ventilation to regulate attic temperature and prevent mold growth. Finally, conduct routine inspections and maintenance to guarantee your roof’s longevity. Mastering these tips is essential for a successful roofing project.
Key Takeaways
- Prioritize safety with proper protective gear and precautions.
- Choose durable materials like metal or asphalt for longevity.
- Follow manufacturer guidelines for underlayment installation.
- Ensure proper sealing techniques to prevent water damage.
- Regularly inspect and maintain flashing for roof integrity.
Choosing the Right Roofing Materials
When choosing roofing materials, take into account factors like durability, cost, and aesthetics to ensure the best choice for your home. Material strength is vital as it guarantees longevity and protection for your roof. Opt for materials like metal, asphalt tiles, or clay tiles known for their resilience against the elements. Affordability is also a key consideration. While initial costs matter, factor in long-term expenses like maintenance and repairs.
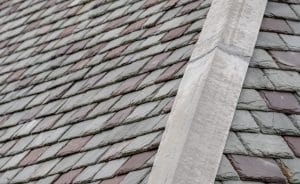
Aesthetic appeal plays a significant role in enhancing your home’s overall look. Choose roofing materials that complement the style and architecture of your house. Materials like slate or wood shakes can add a touch of elegance to your property. Furthermore, consider the environmental impact of the materials you choose. Opt for eco-friendly options such as recycled tiles or metal roofs that are energy efficient and sustainable in the long run. By balancing strength, cost-effectiveness, aesthetic appeal, and environmental impact, you can select the perfect roofing materials for your DIY installation project.
Preparing the Roof Surface
Properly evaluating and preparing the roof surface is vital before beginning the roofing installation process. Before diving into the installation, it’s important to verify the roof surface is ready to support the new roofing materials effectively. Here are some key points to keep in mind:
- Roof surface preparation, weather factors: Check the weather forecast before starting the project. Avoid working on the roof during rainy or windy conditions, as it can jeopardize the safety and quality of the installation.
- Roof surface preparation, safety precautions: Prioritize safety by wearing appropriate protective gear such as gloves, non-slip footwear, and a harness if necessary. Clear the roof surface of any debris or obstacles that could present a hazard during the installation process.
- Roof surface preparation, inspection: Thoroughly examine the roof surface for any signs of damage or rot. Addressing these issues before installing new materials can prevent further damage and ensure a longer lifespan for your new roof.
Installing Underlayment Correctly
Let’s begin by highlighting the significance of proper underlayment placement when installing a new roof. Ensuring the underlayment is correctly positioned and secured is essential for the overall roof system’s effectiveness. Moreover, sealing all seams and edges of the underlayment is important to prevent water infiltration and maintain the roof’s integrity over time.
Proper Underlayment Placement
We make certain the underlayment is positioned accurately before proceeding with the roofing installation. Proper underlayment placement is important for the overall effectiveness of your roofing system. Here are some key points to keep in mind:
- Underlayment Types: Understanding the different types of underlayment available, such as synthetic and felt, can help you choose the one that best suits your needs. Each type has its advantages, so it’s crucial to select the most appropriate one for your specific roofing project.
- Underlayment Installation: Following proper installation techniques is essential for the underlayment to function correctly. Ensuring the underlayment is laid out smoothly, without any wrinkles or gaps, is vital to prevent water infiltration and guarantee the roof’s longevity.
- Tips for Success: Utilize manufacturer guidelines and recommendations for installing the underlayment. Moreover, take into account the climate and weather conditions in your area to determine the most suitable underlayment material and installation method for best performance.
Importance of Sealing
Ensuring the underlayment is sealed correctly is vital for safeguarding your roof against potential water damage and maintaining its durability. Proper sealing methods and waterproofing techniques are essential in preventing leaks and preserving the integrity of your roof. When it comes to sealant application, it is important to pay attention to detail and guarantee that all seams, edges, and penetrations are adequately sealed. Using high-quality sealants can greatly contribute to leak prevention and enhance the overall performance of your roof.
One effective sealing method is using self-adhering underlayment membranes that provide a watertight seal and protect vulnerable areas of the roof. In addition, employing flashing around chimneys, vents, and skylights can further boost waterproofing capabilities. Regular inspection and maintenance of the sealed areas are also vital to address any potential issues promptly and avoid water infiltration. By implementing proper sealing techniques and waterproofing strategies, you can prolong the lifespan of your roof and protect your home from water-related damages.
Navigating Roof Slope Challenges
Managing the steep inclines of roof slopes presents a significant challenge during the installation process. When faced with roof slope considerations, it’s essential to prioritize safety measures to prevent accidents and guarantee a smooth installation. To tackle roof slope challenges effectively, incorporating proper drainage solutions is vital to maintain the longevity of your roof and prevent water damage. Here are three key tips for handling roof slope challenges:
- Use Roof Jacks: Roof jacks provide a stable platform for working on steep slopes, enhancing safety and efficiency.
- Install Drip Edges: Drip edges help direct water away from the roof, preventing pooling and potential leaks on sloped surfaces.
- Consider Roofing Materials: Choosing lightweight roofing materials can make the installation process easier on steep slopes while still ensuring durability.
Flashing and Sealing Techniques
Managing the challenges of roof slope installations often involves implementing effective flashing and sealing techniques to guarantee water-tightness and durability. Proper flashing maintenance is vital for preventing water infiltration at vulnerable points like roof edges, valleys, and around chimneys. Inspecting the condition of flashing regularly and replacing any damaged sections promptly can help maintain the integrity of the roof system.
When it comes to sealing techniques, using high-quality sealants and adhesives is necessary for creating a strong barrier against moisture. Applying sealants around vents, pipes, and other roof penetrations can help prevent leaks and prolong the lifespan of the roof. It is important to follow manufacturer instructions carefully when applying sealants to guarantee maximum effectiveness.
Proper Ventilation Setup
For best roof performance, we prioritize establishing proper ventilation setup to enhance airflow and prevent moisture buildup. Proper ventilation brings several benefits to your roofing system. Here are some key points to keep in mind:
- Ventilation benefits, installation
- Improved energy efficiency: Proper ventilation helps regulate the temperature in your attic, reducing the strain on your HVAC system.
- Extended roof lifespan: By reducing heat and moisture buildup, ventilation can help prevent premature deterioration of roofing materials.
- Enhanced indoor air quality: Adequate airflow helps reduce the risk of mold and mildew growth, promoting a healthier home environment.
When it comes to ventilation, challenges may arise, but there are solutions available:
- Ventilation challenges, solutions
- Insufficient airflow: Ensure proper intake and exhaust vents are installed to allow for adequate air circulation.
- Obstructions: Regularly check vents for any blockages such as debris or insulation that may impede airflow.
- Improper installation: Seek professional guidance to make sure ventilation systems are correctly installed for the best performance.
Final Inspection and Maintenance
Let’s guarantee our roof is in top condition by understanding the importance of a thorough inspection checklist. We’ll also share essential post-installation upkeep tips to maintain the roof’s longevity. Establishing a routine maintenance schedule will help prevent costly repairs down the road.
Inspection Checklist Importance
Before proceeding with the final inspection and maintenance of your roofing installation, make sure that all the necessary steps have been completed according to the inspection checklist. It is essential to follow the checklist diligently to guarantee the longevity and effectiveness of your roof. Here are some key points to keep in mind:
- Safety Precautions: Always prioritize safety when inspecting or maintaining your roof. Use appropriate safety gear such as harnesses, helmets, and sturdy footwear to prevent accidents.
- Roofing Tools: Ensure you have all the necessary tools for the inspection, such as a ladder, hammer, nails, roofing cement, and a caulking gun. Having the right tools will make the process smoother and more efficient.
- Weather Considerations: Check the weather forecast before conducting the final inspection. Avoid working on the roof during adverse weather conditions like rain, strong winds, or extreme heat to prevent accidents and ensure accurate assessments of your roof’s condition.
Following these checklist items will help you complete the final inspection and maintenance of your roofing installation effectively and safely.
Post-Installation Upkeep Tips
Ensure proper maintenance and regular inspections are carried out to preserve the durability and effectiveness of your roofing installation. After the initial setup, it is important to focus on post-installation care to guarantee your roof remains in top shape. Regular gutter upkeep is necessary to prevent blockages and water damage. Blocked gutters can result in water overflow, which can harm your roof and even lead to leaks. Moreover, keep an eye on the condition of your roof tiles and replace any damaged or missing ones promptly. Tile replacement is essential for upholding the weatherproofing of your roof and preventing potential leaks. By addressing these maintenance tasks diligently, you can prolong the lifespan of your roof and avoid costly repairs in the future. Remember, a well-kept roof not only enhances the visual appeal of your home but also offers crucial protection for you and your loved ones.
Routine Maintenance Schedule
To ensure the longevity and performance of your roofing installation, establishing a routine maintenance schedule for final inspections and upkeep is crucial. Regular maintenance not only enhances the lifespan of your roof but also guarantees that it continues to protect your home effectively. Here are some key tasks to include in your routine maintenance schedule:
- Gutter Cleaning: Clogged gutters can lead to water damage and compromise the integrity of your roof. Regularly clean out debris to prevent blockages and maintain proper drainage.
- Roof Tile Replacement: Inspect your roof for any damaged or missing roof tiles. Promptly replace these to prevent leaks and further damage to the underlying structure.
- Final Inspection: Conduct a thorough inspection of your roof at least once a year. Look for signs of wear and tear, such as cracked sealant or loose flashing, and address any issues promptly to prevent more significant problems.
Following a consistent maintenance schedule will help keep your roof in top condition and extend its lifespan.
Conclusion
We hope these DIY tips for roofing installation have been helpful in guiding you through the process. Remember to choose the right materials, properly prepare the surface, and pay close attention to details like flashing and ventilation. With a little bit of elbow grease and determination, you can tackle this project like a pro. So go ahead, reach for the stars and give your roof the makeover it deserves!