Master essential DIY tips for slate roofing installation by selecting high-quality, durable slate tiles with proper color and thickness. Guarantee your roof deck is clean, dry, and free of debris, addressing any issues promptly. Properly install moisture barriers, flashing, underlayment, and starter courses with attention to detail. Use correct nailing techniques and tools for cutting and shaping slate pieces. Secure hip and ridge details efficiently and maintain your slate roof regularly for longevity. Explore further details to enhance your slate roofing project.
Key Takeaways
- Properly prepare roof deck for slate installation to ensure longevity.
- Use high-quality slate for durability and curb appeal.
- Follow manufacturer guidelines for underlayment application.
- Securely fasten slate tiles with correct nailing techniques.
- Pay attention to hip and ridge details for a weatherproof finish.
Selecting the Right Slate Material
When choosing slate for roofing, take into account factors like durability, color variations, and thickness to guarantee a high-quality installation. Slate color options play a significant role in the overall aesthetics of your roof. From classic greys and blacks to vibrant greens and reds, there is a wide range of choices to complement your home’s exterior. It’s crucial to select a color that not only matches your style preferences but also enhances the curb appeal of your property.
Material durability is another critical aspect to keep in mind when selecting slate for your roof. Slate is renowned for its longevity and resistance to harsh weather conditions. Opting for high-quality, durable slate ensures that your roof will withstand the test of time, providing lasting protection for your home. Moreover, thicker slate tiles offer enhanced durability and can better resist damage from impacts or extreme weather events.
Preparing the Roof Deck
First things first, before we lay down any slate, we need to give the roof deck a thorough inspection. Once we confirm the deck is in good condition, we’ll move on to installing a moisture barrier to protect against water damage. After the barrier is in place, we’ll apply the underlayment to provide a smooth surface for the slate installation.
Deck Inspection
Before commencing the slate roofing installation, a thorough deck inspection is vital to guarantee a strong foundation for the roof. Roof deck evaluation and maintenance are pivotal steps in ensuring the durability and longevity of the slate roof. Proper deck preparation and repair are key aspects of this process. Inspecting the roof deck involves checking for any signs of damage, rot, or weakness. It is important to address any issues promptly to avoid future complications with the slate installation. Regular maintenance of the roof deck can help prevent costly repairs down the line.
When preparing the deck for slate roofing, it is imperative to make sure that the surface is clean, dry, and free of debris. Any damaged or rotten sections should be repaired or replaced before proceeding with the installation. Ensuring that the deck is in good condition will provide a solid base for the slate tiles and contribute to the overall stability of the roof. By conducting a thorough deck inspection and completing necessary repairs, you can set the stage for a successful slate roofing installation.
Moisture Barrier Installation
One important step in preparing the roof deck for slate roofing installation is guaranteeing proper installation of a moisture barrier. A moisture barrier helps prevent water infiltration and protects the roof structure from potential damage. Here are some key considerations for moisture barrier installation:
- Flashing Installation: Proper installation of flashing around roof penetrations and intersections is essential to prevent water leaks.
- Roof Slope Considerations: Make sure that the roof slope is adequate to allow water drainage and prevent ponding, which can lead to moisture issues.
- Proper Ventilation: Sufficient ventilation in the attic space helps regulate temperature and moisture levels, reducing the risk of condensation and mold growth.
- Ice Dam Prevention: Installing a proper ice and water shield along the eaves can help prevent ice dams, which can cause water to back up under the roof and lead to leaks.
Underlayment Application
When preparing the roof deck for slate roofing installation, we ensure proper application of the underlayment to provide an extra layer of protection against moisture infiltration. Underlayment offers various benefits, including enhancing waterproofing, preventing leaks, and increasing the roof’s longevity. One of the common mistakes during underlayment application is improper installation, leading to compromised protection against water intrusion.
It is important to take into account the roof slope when applying underlayment. For low-slope roofs, self-adhering underlayment is recommended to guarantee a secure seal, while steep-slope roofs may benefit from mechanically attached underlayment for added stability. Moreover, confirming compatibility between the underlayment and the roofing materials is essential to maintain the roof’s integrity.
Understanding Underlayment Requirements
As we move into the topic of ‘Understanding Underlayment Requirements‘ for slate roofing installation, it’s important to explore the various types of underlayment materials available. Proper installation techniques play a significant role in ensuring the longevity and effectiveness of the underlayment. Moreover, waterproofing considerations are necessary to protect the roof deck and interior of the structure from water damage.
Underlayment Material Types
Our choice of underlayment material greatly impacts the longevity and performance of a slate roof. When considering underlayment options, it’s essential to weigh the benefits and potential installation mistakes that can arise. Here’s a breakdown to help you understand the key factors:
- Underlayment Benefits: Proper underlayment provides an additional layer of protection against water infiltration, ice dams, and helps in maintaining the integrity of the roofing structure.
- Installation Mistakes: Common mistakes during underlayment installation include improper fastening, inadequate overlap, and using the wrong type of underlayment material, which can compromise the roof’s effectiveness.
- Durability: Selecting a durable underlayment material such as synthetic underlayment can enhance the overall resilience of the roof, ensuring long-term protection against the elements.
- Cost Comparison: While traditional felt underlayment may be cost-effective initially, investing in higher-quality materials like synthetic underlayment can lead to long-term savings by reducing the need for premature replacements and repairs.
Proper Installation Techniques
To ensure the effectiveness of the underlayment and maximize the protection it offers, proper installation techniques must be followed with attention to the specific requirements of the slate roofing system. When it comes to proper fastening techniques, expert advice should be sought to optimize that the underlayment is securely attached to the roof deck. Weatherproofing strategies are essential in preventing water infiltration, so it’s crucial to overlap the underlayment correctly and seal any joints or penetrations meticulously.
Common mistakes in underlayment installation include inadequate fastening, improper overlap, and using the wrong type of underlayment for the slate roofing system. To avoid these errors, it’s recommended to carefully follow the manufacturer’s guidelines and possibly consult with roofing professionals for guidance. By taking the time to install the underlayment correctly, you can enhance the longevity and durability of your slate roof while providing the best protection against the elements.
Waterproofing Considerations
Understanding the underlayment requirements is important for ensuring proper waterproofing considerations during slate roofing installation. When it comes to slate roofs, having the right underlayment is vital for weather protection and ensuring the longevity of your roof. Here are some key points to keep in mind:
- Flashing Installation: Proper flashing installation is essential for preventing water infiltration at vulnerable areas such as roof edges, valleys, and around chimneys. Using high-quality flashing materials and installing them correctly can help maintain a watertight seal.
- Weather Protection: The underlayment serves as a barrier against moisture infiltration during extreme weather conditions. Choosing a durable and waterproof underlayment material will provide added protection against rain, snow, and ice.
- Venting Options: Adequate venting is crucial for regulating heat and moisture buildup in the attic space. Proper ventilation can help prevent issues such as mold growth, wood rot, and premature deterioration of the roof structure.
- Heat Regulation: The underlayment also plays a role in heat regulation by providing insulation and reducing heat transfer between the roof and the interior space. This can help improve energy efficiency and maintain a comfortable indoor environment.
Installing Starter Courses Correctly
Properly positioning the first row of slate tiles is important for a successful slate roofing installation. When installing starter courses, ensuring proper alignment is necessary to maintain a straight and even layout. In addition, paying attention to flashing details around roof protrusions and edges is crucial for preventing water seepage and leaks.
To enhance the longevity of your slate roof, focus on weatherproofing the edges of the starter courses. This can be achieved by securely fastening the slate tiles and using appropriate sealants to fill any gaps. Furthermore, considering drainage aspects is key to prevent water buildup and potential damage. Properly directing water away from the roof’s surface can help maintain its structural integrity over time.
Nailing Techniques for Slate Tiles
When nailing slate tiles for installation, verify proper technique to secure them effectively and prevent any potential issues with the roof’s durability. Verifying correct nail spacing and using the proper hammer technique are essential for a successful slate roofing project.
Here are some essential tips for nailing slate tiles effectively:
- Nail Spacing: Maintain consistent nail spacing between each slate tile to provide adequate support and prevent shifting. Typically, a spacing of 3 inches along the top and bottom edges of the slate tile is recommended.
- Hammer Technique: Use a smooth, controlled hammering motion to avoid cracking the slate tiles. Position the nail at the top of the pre-punched hole and gently tap it into place. Avoid excessive force that can damage the slate.
- Angle: Drive the nails into the slate tiles at a slight angle to verify a secure hold without splitting the material.
- Check Stability: After nailing each slate tile, gently tug on it to confirm it is securely in place. This step helps identify any loose tiles that require immediate attention.
Cutting and Shaping Slate Pieces
To achieve precise cuts and shapes when working with slate pieces, practice using specialized slate cutting tools and techniques. When cutting slate, it is essential to use a slate cutter or a diamond-blade wet saw for straight cuts. These tools help maintain clean edges and prevent chipping. For curved cuts or shaping, a slate hammer and stake can be used to carefully shape the slate to fit specific areas on the roof.
One of the key cutting techniques involves making light scores on the slate’s surface before applying more pressure for a clean break. This method helps prevent the slate from breaking unevenly. Moreover, shaping methods such as splitting and trimming with a slate cutter can be employed to achieve the desired sizes and shapes for different areas of the roof.
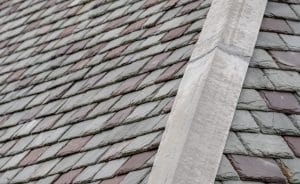
Securing Hip and Ridge Details
For securing hip and ridge details on a slate roof, we employ specific techniques and materials to ensure durability and proper installation. When it comes to the ridge cap and flashing details, attention to detail is essential for a long-lasting slate roof. Here are some vital tips for securing hip and ridge details:
- Proper Installation: Confirm the ridge cap and flashing details are installed correctly to prevent water infiltration and maintain the structural integrity of the roof.
- Sealant Application: Use high-quality sealant to seal any gaps or joints in the ridge cap and flashing details. This helps to improve the waterproofing capabilities of the roof.
- Regular Maintenance: Inspect the ridge cap and flashing details periodically for any signs of damage or wear. Promptly address any issues to prevent them from escalating.
- Weatherproofing: Consider applying additional weatherproofing measures to the ridge cap and flashing details to enhance their resilience to harsh weather conditions.
Maintaining Your Slate Roof
Regular upkeep is important for maintaining the longevity and performance of your slate roof. Implementing roof maintenance and weatherproofing methods is essential in ensuring the durability of your slate roof. To uphold your slate roof effectively, it is necessary to perform regular inspections to identify any signs of damage or wear. DIY repairs can be carried out promptly to address minor issues before they escalate into more significant problems. Preventative measures such as clearing debris, keeping gutters clean, and trimming overhanging branches can help prevent damage to your slate roof. Moreover, applying weatherproofing techniques like sealing cracks and ensuring proper ventilation can enhance the resilience of your roof against harsh weather conditions. By staying proactive and addressing maintenance tasks promptly, you can extend the lifespan of your slate roof and keep it in prime condition for years to come.
Conclusion
To sum up, installing a slate roof can be a challenging but rewarding DIY project. Did you know that slate roofs can last up to 100 years with proper maintenance? With the right materials, techniques, and attention to detail, you can enjoy the timeless beauty and durability of a slate roof for decades to come. Happy roofing!